

 Ukwuoma Precious Chimamaka
Picture this: You’re rubbing your growing belly, feeling a firm kick on one side and a roll on the other, but you wonder, “Where is my baby exactly?”
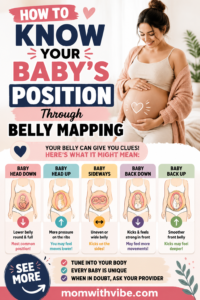
Belly mapping gives you a fun, hands-on way to track that position after 34 weeks. You use kicks, your belly’s shape, and light touches to find the head, back, or bottom.
It builds a stronger bond with your baby, preps you for birth, and gives doctors useful details (like how position affects delivery). It’s no ultrasound substitute, but it empowers you. Watch this quick video to see it in action.
Let’s start with what you’ll need.
Why Belly Mapping Makes Late Pregnancy More Exciting
You hit 34 weeks, and suddenly every wiggle feels like a mystery. Belly mapping turns those guesses into real insights about your baby’s position in pregnancy. It adds thrill to the wait by letting you picture your little one clearly. No more wondering if that kick came from a foot or elbow. Instead, you connect deeply while spotting clues that matter.
Visualize Your Baby’s Exact Spot
Start simple. Watch for patterns in kicks, hiccups, and rolls. Kicks often signal feet, while hiccups bubble from the lower belly if the head sits high. Rolls mean baby stretches across your tummy.
This mapping helps you see the full picture. You learn where the head rests, the back curves, or the bottom pushes out. As a result, late pregnancy shifts from vague feelings to a clear mental image. “I finally knew my baby’s position every night; it made me feel like her tour guide,” says Sarah, a mom from Texas.
Spot Breech or Tricky Positions Early
Catch issues before they surprise you at birth. A breech baby, with bottom down, shows as a squishy spot at the top of your belly. Hard lumps low down? That points to the head near your bladder.
Early notice gives time to act. Try gentle moves or talk to your doctor about options like external cephalic version. Check the Spinning Babies belly mapping guide for proven tips. You avoid last-minute stress this way.
Here’s a quick table of common movement clues:
| Movement Clue | Likely Body Part | Where You Feel It |
|---|---|---|
| Hard, round bump | Head | Top or bottom of belly |
| Squishy, lumpy | Butt | Opposite the back |
| Firm, smooth ridge | Back | One side of your tummy |
| Quick flutters | Hands or elbows | Near the back |
| Strong pushes | Feet | Lower belly or sides |
Use this during quiet evenings when baby moves most.
Ease Anxiety Over Labor Positions
Knowing the baby position pregnancy details calms your mind. Posterior babies, facing your belly, cause back labor aches. Mapping reveals that smooth back on your spine side.
You prepare better. Positions like hands-and-knees help turn them. Doctors love the info too; it sparks useful chats at checkups. Anxiety drops because you feel in control.
Make It a Fun Bonding Ritual
Turn mapping into playtime. Sit comfy in the evening, 34 to 36 weeks, when baby’s active. Partner joins by feeling kicks too.
Talk to baby as you trace. “Hey there, little kicker, show me your spot.” It builds love fast. Plus, tracking changes week by week excites you both. Late pregnancy feels alive, not just a countdown.
Set Up for Success Before You Start Mapping
You want clear feels from your baby, right? A smart setup sharpens those touches and boosts accuracy. Do this right, and mapping becomes simple fun. Skip it, and you might miss key clues.

Pick Simple Tools
No fancy gear required. Your hands do the work. For extras, grab these:
- A soft marker to draw belly quadrants (top, bottom, left, right).
- Paper or a doll to sketch baby’s spot.
- A mirror for side views.
- The Spinning Babies Belly Mapping handout for quick reference.
These help you track over 1-2 days and spot patterns.
Find the Best Time and Spot
Baby moves most 1-2 hours after meals. Pick evenings when active. Empty your bladder first; it softens your belly. Lie on your left side or back with knees propped on pillows. Warm your hands under water. Rub lotion if needed for smooth glides.
Quiet room helps. Dim lights, breathe deep, relax 10 minutes. Placenta or belly size can blur feels, so go slow.
Follow These Prep Steps
Ready? Here’s your quick checklist:
- Eat light and wait 1 hour for active baby.
- Pee first, then settle in your spot.
- Warm hands and apply lotion.
- Divide belly into four zones with marker.
- Lie back, breathe easy, wait for moves.
Patience pays off. Practice daily; habits show in days. Now you see changes clear.
The Easy Three-Step Hands-On Belly Mapping Method
Ready to pinpoint your baby’s spot? Spinning Babies breaks it down into three straightforward steps you can do at home. Practice for 10 to 20 minutes each evening with light, gentle touches. Always stay relaxed; stop if anything hurts. You’ll track movements first, feel body parts next, then sketch the layout. This builds your skills fast.

Step 1: Tune In to Your Baby’s Daily Moves
Pick a quiet evening spot after a light snack. Lie on your left side or recline with pillows. Wait for those familiar wiggles, then feel for 10 to 20 minutes straight. Note where each happens: strong kicks often mean feet pushing low or on sides, quick jabs signal hands near the back, rhythmic hiccups pulse near the butt, and a firm ridge traces the spine along one side.
Mark spots right away. Use a washable marker to divide your belly into four quadrants (upper left, upper right, lower left, lower right). Or sketch them on paper. Patterns emerge over a day or two. If baby stays quiet, try gentle ways to encourage movement.
Quick clues help you sort it out:
| Movement Clue | Likely Body Part | Common Spot Felt |
|---|---|---|
| Strong kicks | Feet | Lower belly or sides |
| Quick jabs | Hands/elbows | Upper sides near back |
| Rhythmic jerks | Hiccups (butt) | Lower center or sides |
| Smooth firm line | Back | One full side of belly |
| Lumpy pokes | Knees/arms | Opposite the back |
Spot these daily. You gain confidence quick.
Step 2: Palpate Like a Pro with Leopold’s Maneuver
Now use your hands like pros do. Leopold’s maneuvers let you check key spots with simple grips. Warm your palms first, then glide gently over a relaxed belly. Face a mirror if it helps. Do this after movements settle.
Follow these four steps:
- Check the top (fundus): Place both hands flat on the upper belly. Feel for a hard, round ball that barely wiggles; that’s the head. A soft, movable lump means butt. Press lightly.
- Feel the sides: Run flat hands down each flank. One side stays firm and smooth; that’s the back. The other feels knobby with limbs poking out.
- Grip the bottom: Cup hands low near your pubic bone. A hard, tucked ball that doesn’t shift much signals head down. If it’s higher and free-floating, baby might sit breech.
- Test the pelvis: Slide fingers into the pelvic groove. Feel if the head dips in and engaged. Do the wiggle test: gently rock top and bottom parts. Head resists; butt shifts easy.
Practice builds accuracy. See BabyCenter’s Leopold’s guide for visuals. Always gentle; no deep pokes.
Step 3: Sketch Your Baby’s Position on Paper or Doll
Pull it together now. Grab paper or that doll from your tools. Match movement spots to palpation finds: kicks low plus hard top means head-up breech, say. Draw lines for the back, circles for head and butt, squiggles for limbs.
Pose the doll to mimic. Does it fit? Tweak as needed. If you have a home Doppler, listen for the heartbeat. It thumps loudest over the back, faint near front. Lower tones hint head down. Note changes weekly. Your map sharpens with each try.
Spot Common Positions and What They Mean for Birth
You’ve mapped the kicks, felt the hard spots, and sketched it out. Now match those clues to common baby positions. This step shows if your little one sits ideal for birth or needs a nudge. Spotting LOA, ROA, OP, breech, or transverse early lets you prep smart. Anterior spots like LOA or ROA mean smooth sailing. Others bring backaches or C-section talks. Here’s how to tell them apart with your belly map.
Ideal Anterior Positions: LOA and ROA
Left occiput anterior (LOA) or right occiput anterior (ROA) top the list. Baby faces your back, head down with chin tucked. You feel a hard, round head low near your pubic bone. The smooth back ridge runs along your left or right side. Kicks poke from the top or opposite side.
These shine for birth. Labor speeds along because the head slips through the pelvis easy. Less pain, fewer interventions. Most babies hit this by 36 weeks. Your map confirms it when the firm back hugs one flank and limbs bump the other.
Tougher Head-Down: Occiput Posterior (OP)
OP, or sunny-side up, flips baby to face your belly. Head stays down, but the back presses your spine. Back labor hits hard with constant aches. You spot a hard head low, but the smooth back sits in the middle or your front. Kicks and elbows jab low sides or bottom.
Labor drags here, often twice as long. Baby might rotate late, but forceps or C-section odds rise. Upright moves like walking help turn them. Tell your doctor; they check with ultrasound.
Breech: Bottom or Feet First
Breech flips head up. Feel a soft, squishy butt high in the fundus that shifts easy. Hard head lumps low near your bladder, causing frequent pees. Kicks flutter from the top. Frank breech has legs up by head; footling drops feet first.
Vaginal birth risks spike, so C-sections rule after 36 weeks. Cord prolapse threatens in footling types. Share your map; doctors try external cephalic version or Spinning Babies exercises like forward leans.
Transverse Lie: Sideways Across
Baby lies horizontal, shoulder to pelvis. No clear head or butt top to bottom. Back curves across your side; limbs poke everywhere. Belly looks wide and flat.
No vaginal option here. C-section follows. Low fluid or multiples raise odds. Your doctor confirms and plans ahead.
Use this quick reference for your next map:
| Position | Key Belly Signs | Birth Impact | Next Steps |
|---|---|---|---|
| LOA/ROA | Head low, back on one side | Easy, fast labor | Keep mapping, relax |
| OP | Head low, back in middle | Long labor, back pain | Upright positions, tell doctor |
| Breech | Soft top, hard bottom | High C-section risk | Spinning Babies, version |
| Transverse | No head/butt poles, wide belly | C-section only | Doctor ultrasound ASAP |
Not ideal? Don’t panic. Tell your midwife at the next visit. Try Spinning Babies daily exercises: hands-and-knees for 10 minutes, swim, or side-lying. Most turn by 37 weeks. You gain control and cut surprises.
Boost Accuracy and Know When to Call Your Doctor
Your belly maps get sharper with practice, but small tweaks make a big difference. Pair that with clear signs to contact your doctor, and you stay confident. Babies shift positions often, so mapping guides you without replacing pro checks.
Sharpen Skills with Simple Habits
Stick to the same time each day, like evenings after dinner when baby stirs most. Patterns pop out faster that way. Ask your partner to join; their fresh hands spot what you miss, and it turns mapping into shared time.
An anterior placenta can muffle feels because it sits in front. You still map, but expect softer clues. Warm hands and lotion help. Track over two days for better reads.
Understand Belly Mapping’s Limits
This method clues you in, but it’s not a diagnosis. Ultrasounds give the full picture. Babies flip between sessions, so one map shows a snapshot. If results confuse you, that’s normal.
Spot Red Flags and Call Right Away
Less movement worries most. Lie on your left side after a snack; count 10 moves in two hours. Fewer? Or a sudden drop? Call your doctor or head to labor and delivery now. No movement for hours means go immediately, even at night.
Other signs include constant pain, bleeding, or swelling. What to Expect details kick count rules. Always safe to check; pros use ultrasound and monitors.
Share your maps at visits. They love the details and confirm positions. Stay encouraged: you catch changes early and bond deeper. Your instincts count most.
Conclusion
Belly mapping boils down to three steps: track movements, palpate gently, and sketch the layout. You spot the head, back, and limbs with your own hands after 34 weeks. This hands-on method reveals positions like LOA or breech, so you prep for smoother births.
The real win is that deeper connection with your baby. Every kick and roll turns into a clear picture, easing worries and adding joy to late pregnancy. Plus, you catch changes early and chat smarter with your doctor.
Start tonight in a quiet spot after dinner. Feel those wiggles and map away; it’s a magical way to bond right now.
Try belly mapping this week. Share your baby’s position discoveries in the comments below. Always consult your doctor for confirmation, since this empowers you but doesn’t replace ultrasounds. You’ve got this.
save pin for later

- 12 Things Pregnant Women Do When They’re Alone - June 7, 2026
- 25 Healthy Pregnancy Snacks You Should Try - June 7, 2026
- 100 Funny Baby Jokes That Will Make You Laugh - May 15, 2026