
 Mom with Vibe Team
Changing a diaper is one of the most fundamental skills every parent or caregiver must master. It’s an unavoidable task, but with proper knowledge and preparation, it can be performed swiftly and seamlessly.
Necessary Supplies for Changing a Diaper
Before starting, make sure you have all the necessary supplies within reach. Having everything in one place is important to change a diaper efficiently and comfortably for both you and your baby. Here’s a list of essential items for the task:
- Clean Diaper: Ensure you have the correct size diaper based on your baby’s weight and age.
- Baby Wipes: Stock up on wipes for cleaning your baby’s bottom effectively.
- Diaper Cream or Ointment: If your baby has sensitive skin or a diaper rash, have a diaper cream or ointment on hand.
- Changing Pad or Towel: Maintain hygiene by using a soft, clean changing pad or towel.
- Diaper Disposal Bag: Keep a disposal bag handy for easy disposal of dirty diapers and wipes.
How to Change a Diaper
Step 1: Wash Your Hands
Begin by washing your hands thoroughly with soap and water. Hygiene is crucial to prevent the spread of germs and infections, so always clean your hands before and after changing your baby’s diaper.
Step 2: Set Up a Safe Changing Area
Ensure you have a safe, flat, and clean surface to change your baby. If you’re using a changing table, make sure to always keep one hand on your baby. If you’re changing on the bed or floor, place a changing mat or towel on the surface to protect it.
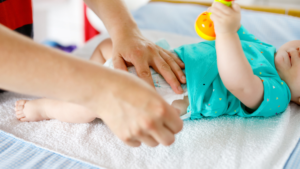
Step 3: Lay Your Baby Down
Carefully lay your baby on their back, with their head supported by a soft pillow or blanket, if necessary. Make sure your baby is calm and comfortable during the diaper-changing process. You can use a soft toy or gently talk to your baby to keep them engaged if they are particularly wiggly.
Step 4: Open the Dirty Diaper
Once your baby is lying down, unfasten the diaper tabs, which are typically on each side of the diaper. Gently pull down the front of the diaper, being careful not to irritate your baby’s delicate skin. If you have a boy, you might want to use a cloth or wipe over the genitals for extra protection against potential sprays of urine.
Step 5: Clean Your Baby’s Bottom
Now, it’s time to clean your baby’s bottom thoroughly. Use baby wipes to gently wipe your baby’s bottom from front to back, preventing bacteria from moving toward the genital area. Make sure to clean the entire area well if your baby has a bowel movement, using a fresh side of the wipe if necessary.
If you notice any diaper rash or irritation, you can apply a protective diaper cream to soothe and protect your baby’s skin. Gently rub the cream onto any red or inflamed areas. Diaper rashes are common but can be prevented with frequent diaper changes and thorough cleaning.
Related:What To Do When Your 3 Year Old Won’t Poop On The Potty
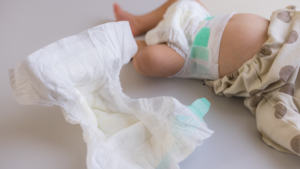
Step 6: Lift Your Baby’s Legs and Remove the Dirty Diaper
Lift your baby’s legs by gently holding both ankles with one hand. Use your other hand to pull the used diaper away from under your baby. If there’s any mess, fold the diaper over it before disposing of it to contain the waste. Place the dirty diaper into the diaper disposal bag you’ve prepared.
Step 7: Slide a Clean Diaper Underneath
Before sliding the clean diaper, double-check that it’s the correct size for your baby and that it’s oriented correctly. The back of the diaper should be at the baby’s waist with the tabs on the sides.
Once aligned, carefully slide the back of the clean diaper under your baby’s bottom, making sure the top edge of the diaper is even with your baby’s belly button.

Step 8: Fasten the New Diaper
Bring the front of the clean diaper up between your baby’s legs and fasten the side tabs securely, without making it too tight. The diaper should be snug but comfortable. You should be able to fit one finger between the diaper and your baby’s waist.
For newborns and infants, ensure the diaper is snug around their legs to avoid leaks. For older babies or toddlers, you may need to adjust the fit for added comfort. Always check that the diaper is not too loose, which could cause leaks.
Related: How to Bathe a Baby
Step 9: Check for Leaks and Adjust
After fastening the diaper, check around the edges to ensure there are no gaps. Gently tug on the diaper to confirm it’s positioned correctly. For babies with active movements, make sure the diaper is secure around the waist and legs. If there are any gaps, re-fastening the diaper may be necessary.
Step 10: Clean Up and Wash Your Hands
After your baby is diapered and comfortable, it’s time to clean up. Dispose of the dirty diaper and wipes properly by sealing them in the diaper disposal bag. Place any used wipes or other items in the trash, away from your baby’s play area.
Lastly, wash your hands again with soap and water to ensure all germs are eliminated. Clean hands are essential to avoid spreading bacteria or infections.
Related: 10 Diaper Bag Essentials Checklist For Newborn
Diaper Changing Tips and Tricks
- Change Diapers Frequently: Newborns typically require a diaper change every 2 to 3 hours, while older babies can go longer. Change your baby’s diaper at least every 2 to 3 hours or when it becomes soiled to prevent diaper rash and discomfort.
- Monitor for Diaper Rash: Diaper rash is common but can be prevented by frequent diaper changes, using diaper cream, and allowing your baby some diaper-free time to let their skin breathe.
- Have Everything Prepared: Prepare a diaper-changing station with all the necessary supplies. You don’t want to leave your baby unattended while looking for wipes or a new diaper.
- Stay Calm and Patient: Babies may be fussy during diaper changes, especially when they’re tired or hungry. Maintain a calm demeanor and speak to your baby in a soothing voice to make the process easier.
- Be Gentle: Babies have sensitive skin, so be gentle when cleaning and changing them. Avoid pulling on the diaper or cleaning too roughly. Always wipe from front to back to prevent infections.
Related:How to Treat Yeast Diaper Rash
When to Change Your Baby’s Diaper
- After Feedings: Newborns often have a bowel movement after each feeding, especially during the first few months.
- Wet or Soiled Diaper: If your baby’s diaper is wet or soiled, it should be changed promptly to avoid discomfort and potential skin problems.
- Before Bedtime: Change your baby’s diaper before they go to sleep for the night to help them stay dry and prevent leaks.
- Signs of Discomfort: If your baby seems fussy or uncomfortable, check their diaper. A wet or dirty diaper may be the cause of their discomfort.
Final Thoughts
Changing a diaper may seem overwhelming at first, but it quickly becomes a routine part of daily care.
Remember, every baby is different, so you may need to adapt and find what works best for your little one.
With the step-by-step instructions and a little patience, you’ll be able to keep your baby clean, comfortable, and happy throughout the day.
Save the pin for later
- 10 DIY Sensory Play Activities for Toddlers - March 12, 2026
- 12 Family Organization Systems for Busy Moms - March 12, 2026
- How to Change a Diaper: A Step by Step Guide - March 11, 2026